.jpg)
Sunday, April 17, 2011
We bought it!
Well it wasn't too long ago that I was glum because a possible house purchase fell through. Well good news has been had - that sale is back up and running. There were a few issues with piling under the house but we have sorted those and the sale is back on. All going to plan we should be moving in 3 weeks. We will then be the proud owners of a lilac coloured seventies, brown carpet, floral wallpaper, naff curtained home in need of much love and affection. I suspect we will become overnight experts in wall treatments and weeding but it was bound to happen at some stage. The exciting part is we will have some space to move and some cupboards to store things. Giant leaps forwards.
Wednesday, April 13, 2011
My new cowl neck top
A few weeks ago a friend and I managed to wangle ourselves off to a Fashion Workshop lesson on copycat pattern making. Jen's Fashion Workshop does a number of workshops and lessons and does a great job of finding those subjects that those of us sitting at home quite want to know.  I had been meaning to try and copy a grey top I bought in Paris years ago that is very plain but straddles casual, work and evening. I thought I might be able to manage it. This was a great impetus to finally get that top done. Jen teaches you in this how to copy tops and trousers from your existing favourite items. I sewed up this top using the pattern I made. Jen had taught us to measure the ajoining seams to make sure they match but I forgot once I got home and my only glitch was the sleeves - I didn't measure the arm hole compared to the top of the sleeves and the sleeves ended up being bigger. So I had to do a bit of emergency mid-sew gathering at the top of the sleeve but it looks ok. Plus I was quite fond of the length of the sleeves as is and didn't want them shorter so I just did a rolled hem on the sleeves and the neck rather than a proper turned up hem, which gives it a bit of a raw finish but I quite like it. Thanks Jen. I'd recommend Jen's courses to anyone and I hope to do another this term sometime.
 I had been meaning to try and copy a grey top I bought in Paris years ago that is very plain but straddles casual, work and evening. I thought I might be able to manage it. This was a great impetus to finally get that top done. Jen teaches you in this how to copy tops and trousers from your existing favourite items. I sewed up this top using the pattern I made. Jen had taught us to measure the ajoining seams to make sure they match but I forgot once I got home and my only glitch was the sleeves - I didn't measure the arm hole compared to the top of the sleeves and the sleeves ended up being bigger. So I had to do a bit of emergency mid-sew gathering at the top of the sleeve but it looks ok. Plus I was quite fond of the length of the sleeves as is and didn't want them shorter so I just did a rolled hem on the sleeves and the neck rather than a proper turned up hem, which gives it a bit of a raw finish but I quite like it. Thanks Jen. I'd recommend Jen's courses to anyone and I hope to do another this term sometime.
Tuesday, April 5, 2011
New purse inners - so pretty........
 Managed to squeeze in a trip last week to my favourite secret fabric stash shop. Lucked upon a range of fabric pieces that I thought were just gorgeous. So gorgeous in fact I simply couldn't decide which colour was best. I 'ummed' and 'ahhed' and ultimately did what any good woman would - bought the lot. So this is the basis for the next range of purses. These colours are so lovely and the material i
 s slightly coated which makes it a durable inner for the purses.
 I made a couple of the purses with this deep brown fabric I found for the outer and my new lovely fabric as inners. I haven't made the matching broaches yet but I really like the contrast of the woven outer with the slightly flashy metallic inner (the lushness doesn't come out in these photos at all). I'll try and get myself sorted to do the broaches this week and then pop them up on my Felt shop.
I also thought I might try a slightly bigger version of the purse. This was my first try which is a tiny bit wonky at the top fold over. Whislt a shame, the up-side is that it  means I get to keep this one. I took it for a trial run over the weekend when we went out for dinner (ended up as drinks but was meant to be dinner). It fits nicely under your arm and holds a bit more than the other. I'm giving it the nod myself (but then I guess I am biased).
 means I get to keep this one. I took it for a trial run over the weekend when we went out for dinner (ended up as drinks but was meant to be dinner). It fits nicely under your arm and holds a bit more than the other. I'm giving it the nod myself (but then I guess I am biased).
 Thursday, March 10, 2011
Blackberry Jam
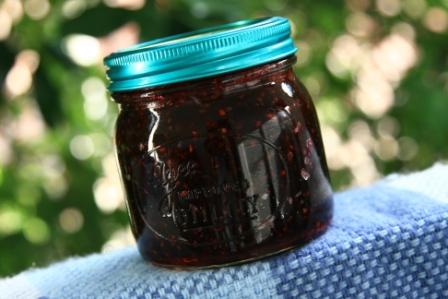 During the market preliminaries in the weekend, we took a detour to pick some blackberries along the road side in Upper Hutt.
 And it is with great delight that I present Vanessa's Jam Extraordinary - a wondrous array of berry flavours, delightfully set and presented perfectly in this jar. In all seriousness - I'm impressed. You'll be achieving your self-sustained lifestyle soon enough! And thanks for sharing.
Monday, March 7, 2011
Newtown Festival shivers
Well, I can't pretend it was everything I had dreamed it would be. When I woke up during the night to hear the rain pelting down on the roof, my wee heart sank. And on Sunday morning when the rain was flying sideways past my window I figured the stall was not happening. I waited and waited and about midday toddled down to my spot in the vain hope the rain would hold off.
And yes, it was arctic - a stark contrast to 2010 when it was sunny and glorious. One shouldn’t have to wear a winter coast and gloves in the first weekend of March. But I am SO PLEASED I turned up - even though it was just for a few hours. It was great to see what customers liked and I appreciated all the lovely comments from people. Thank you so much to those who came up to see my stall and share nice words and to those who liked things enough to take an item home. It was so nice to get some feedback on things and to chat to the lovely and encouraging ladies at the next door stall - it has inspired me to try more markets and take things further. And lastly (I know – this is reading a bit like an Oscars speech but without the satin gowns) thanks to my dear friend Vanessa and my man who stood by and gave me the strength to set the stall up, even though the weather threatened to wash away my will. Wonderful!
And yes, it was arctic - a stark contrast to 2010 when it was sunny and glorious. One shouldn’t have to wear a winter coast and gloves in the first weekend of March. But I am SO PLEASED I turned up - even though it was just for a few hours. It was great to see what customers liked and I appreciated all the lovely comments from people. Thank you so much to those who came up to see my stall and share nice words and to those who liked things enough to take an item home. It was so nice to get some feedback on things and to chat to the lovely and encouraging ladies at the next door stall - it has inspired me to try more markets and take things further. And lastly (I know – this is reading a bit like an Oscars speech but without the satin gowns) thanks to my dear friend Vanessa and my man who stood by and gave me the strength to set the stall up, even though the weather threatened to wash away my will. Wonderful!
Thursday, March 3, 2011
Stall preps
So, the stall preparations continue.
I am concerned I don't have much 'stock' but I guess its more a market testing exercise than a "look, I've become a professional crafter overnight" exercise. I think I just expect a bit much of myself - a half-mast attempt doesn't suit. Anyway, having looked at the weather forecast for Sunday I'm not holding out much hope for a big day.
- I have been tidying up the purses and bags. I had needed to stitch the linings closed where they had been turned which is always the dull part. Two hours in front of The Biggest Looser last night dealt to most of them. (Is it wrong to sit on your arse and watch Biggest Loser?)
- I have also printed some signs for the products.
- I'm been fretting about displaying the shoulder bags. I wish I had bought the dress form I have been eyeing up the last few months but I simply don't have any space at home. I'm crammed into a cupboard type arrangement as it is, so the dress form has always been the treat I would shout myself once I get a bit more space. However, I'm wishing I had one now as it would look great with some bags slung over. Anyway - my only other option was perhaps a coat rack so I'm hoping to borrow a coat rack from work and have some of the shoulder bags hanging from that. Not entirely sure how to make a coat rack look nice but never mind.
- I made some price tags. I was horrified to see that a pack of 5 price tags was $7 at the stationers. Yeah right. So I bought an 80cent manila folder and made some.
- I've been stockpiling $5 and $10 notes for change (perhaps optimistic of sales but hey - gotta go in positive right?) so I have a wallet of mid-sized cash.
- I had big dreams about getting some paper bags and stamping them with a threadbird design (for my many sales). Sadly when I dashed to the wholesale supplier yesterday, they were out of stock of the right sized bags. Bit bummed - I thought this would be great idea. Though to be honest, perhaps an unnecessary expenditure at this point in the game. - I've just been lectured by a dear friend that printing carry bags is not the aim of a first-time stall-holder, Roger that!
- And today I have taken a few photos of the flags in various locations. My friend Deb has a lovely house (complete with baby) that makes a great back drop for the flags - very photogenic. I thought having a few photos of how the flags can be used (on a cot, in the garden etc) might act as a good prompt for people.
- I have been tidying up the purses and bags. I had needed to stitch the linings closed where they had been turned which is always the dull part. Two hours in front of The Biggest Looser last night dealt to most of them. (Is it wrong to sit on your arse and watch Biggest Loser?)
- I have also printed some signs for the products.
- I'm been fretting about displaying the shoulder bags. I wish I had bought the dress form I have been eyeing up the last few months but I simply don't have any space at home. I'm crammed into a cupboard type arrangement as it is, so the dress form has always been the treat I would shout myself once I get a bit more space. However, I'm wishing I had one now as it would look great with some bags slung over. Anyway - my only other option was perhaps a coat rack so I'm hoping to borrow a coat rack from work and have some of the shoulder bags hanging from that. Not entirely sure how to make a coat rack look nice but never mind.
- I made some price tags. I was horrified to see that a pack of 5 price tags was $7 at the stationers. Yeah right. So I bought an 80cent manila folder and made some.
- I've been stockpiling $5 and $10 notes for change (perhaps optimistic of sales but hey - gotta go in positive right?) so I have a wallet of mid-sized cash.
- I had big dreams about getting some paper bags and stamping them with a threadbird design (for my many sales). Sadly when I dashed to the wholesale supplier yesterday, they were out of stock of the right sized bags. Bit bummed - I thought this would be great idea. Though to be honest, perhaps an unnecessary expenditure at this point in the game. - I've just been lectured by a dear friend that printing carry bags is not the aim of a first-time stall-holder, Roger that!
- And today I have taken a few photos of the flags in various locations. My friend Deb has a lovely house (complete with baby) that makes a great back drop for the flags - very photogenic. I thought having a few photos of how the flags can be used (on a cot, in the garden etc) might act as a good prompt for people.
 - And I've made a few little tid-bits. Some of the Divine Twine I ordered in from the States. I've made some little cards with 10metres of twine each so people can use themselves. And I made a few magnets with the high-domed cabochons. These will be priced at below cost but I still like the idea and I think they make better magnets than broaches to be frank.
- I still have to make some of the wrist straps for the purses and figure out how the display will work. Oh, and I need to remember to take some weights to keep things from blowing away if it turns out to be a horrid Wellington day. *sigh*
Too much to do!
Tuesday, March 1, 2011
Low maintenance Bacon and Egg Pie
I've been meaning to share this recipe for a while as the be all and end all of your picnic or Pot Luck problems.
I discovered this recipe in the Comfort recipe book a while ago, and it is now a standard. It takes no time to whip up and I challenge you to find anyone who doesn't like bacon and egg pie. The thing I love the most about this recipe is the lack of dishes. No fry pan required, no cups for beating or bowls for mixing. Just a chopping board, knife, grater and the tin you cook it in. Love it.
Process as follows:
Turn on oven to about 210 degrees. (the suggestion in the recipe was to put an oven tray in the oven whilst its heating so tray gets hot and then when you put the pie in and place on tray, this helps cook the bottom pastry of the pie. Not sure how sound the theory is but hey - it works so lets not mess with it.)
 I use frozen flaky puff pastry - its about ease after all. 2 sheets needed. Defrost the pastry. I have been using a square tin because the pastry is square (less effort = more smiles). Of course you can roll the pastry to fit a circular tin and it will look much nicer, but I'm all for minimising the time to make this. Plonk one sheet of pastry in a greased tin to form the base and sides of pie.
For the filling:
- Grate some cheese and throw into the pastry case (about 1 cup I guess - but depends on your taste). [Grater goes to dishwasher.]
- Thinly slice bacon (4 rashers) into strips and then bits, and throw on top of cheese. Note - no prior cooking required. Yay.
- Then crack 6-7 eggs whole straight on top of the bacon (recipe said 9 eggs but seemed a bit full on and my pie was smaller - I used 6-7 depending on size). Egg will slop around a little but try not to break the yolks. Space out the yolks around the pie and let the whites dribble into the other areas. At this point I keep aside a teeny bit of one of the eggs to glaze the pastry at the end - this is likely to mean one of your eggs will break but hey - who cares.
- Chop up some basil and parsley and sprinkle on top of eggs. Salt and pepper if you wish (I usually forget this stage but I encourage you to remember it).
- Thinly slice tomato and place slices on top of eggs/herbs. [Chopping board and knife to dishwasher.]
- Throw on the top of pastry. Press pastry lid and sides together to seal pie - use a fork if necessary. I usually use a little strip of extra pastry to make a + decoration on top - do whatever you feel. Brush pastry with leftover egg to make sure pastry top looks browned and delicious.
Then throw in oven for about ~45-50mins at about 200 degrees. [wipe bench]
Take out from oven and if you think its fine, leave in tin for 5-10mins. Turn out of tin and place on cooling rack to dry.
Honestly, so easy and so yummy - you feel guilty when someone compliments you on this one.
I discovered this recipe in the Comfort recipe book a while ago, and it is now a standard. It takes no time to whip up and I challenge you to find anyone who doesn't like bacon and egg pie. The thing I love the most about this recipe is the lack of dishes. No fry pan required, no cups for beating or bowls for mixing. Just a chopping board, knife, grater and the tin you cook it in. Love it.
Process as follows:
Turn on oven to about 210 degrees. (the suggestion in the recipe was to put an oven tray in the oven whilst its heating so tray gets hot and then when you put the pie in and place on tray, this helps cook the bottom pastry of the pie. Not sure how sound the theory is but hey - it works so lets not mess with it.)
 I use frozen flaky puff pastry - its about ease after all. 2 sheets needed. Defrost the pastry. I have been using a square tin because the pastry is square (less effort = more smiles). Of course you can roll the pastry to fit a circular tin and it will look much nicer, but I'm all for minimising the time to make this. Plonk one sheet of pastry in a greased tin to form the base and sides of pie.
For the filling:
- Grate some cheese and throw into the pastry case (about 1 cup I guess - but depends on your taste). [Grater goes to dishwasher.]
- Thinly slice bacon (4 rashers) into strips and then bits, and throw on top of cheese. Note - no prior cooking required. Yay.
- Then crack 6-7 eggs whole straight on top of the bacon (recipe said 9 eggs but seemed a bit full on and my pie was smaller - I used 6-7 depending on size). Egg will slop around a little but try not to break the yolks. Space out the yolks around the pie and let the whites dribble into the other areas. At this point I keep aside a teeny bit of one of the eggs to glaze the pastry at the end - this is likely to mean one of your eggs will break but hey - who cares.
- Chop up some basil and parsley and sprinkle on top of eggs. Salt and pepper if you wish (I usually forget this stage but I encourage you to remember it).
- Thinly slice tomato and place slices on top of eggs/herbs. [Chopping board and knife to dishwasher.]
- Throw on the top of pastry. Press pastry lid and sides together to seal pie - use a fork if necessary. I usually use a little strip of extra pastry to make a + decoration on top - do whatever you feel. Brush pastry with leftover egg to make sure pastry top looks browned and delicious.
Then throw in oven for about ~45-50mins at about 200 degrees. [wipe bench]
Take out from oven and if you think its fine, leave in tin for 5-10mins. Turn out of tin and place on cooling rack to dry.
Honestly, so easy and so yummy - you feel guilty when someone compliments you on this one.
Subscribe to:
Posts (Atom)